Raspberry Pi - The Lab Model [gav-pi5]

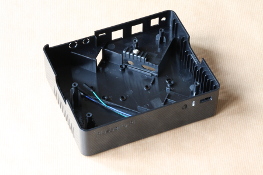
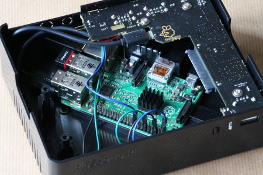
This is something that the Raspberry Pi world has been waiting for - and I've no idea why it took so long for one to come to market... an enclosure with built in USB hub and SATA connector, allowing a hard drive to be easily in the same box as the Pi (I know I've already done this with my Car Media Server, but that's very much a "shove it in a box" affair). This is a well engineered design.
The Plusberry Pi was an Indiegogo crowd funding project that I stumbled upon, thought was a good idea, so backed in February 2015. The unit eventually arrived in October of that year, so here's what I did with it...
I've opted for two graphical distributions (depending on use): Ubuntu Mate, and Raspbian as the quad core of the Pi 3 is quite capable of running it. It also means that the desktop looks like every other computer in the house as they all run Ubuntu Mate (unless it's running Raspbian which is really only for using with Flotilla which is a very cool kit for teaching kids about electronics.
Here's a step-by-step of how to set it up:
-
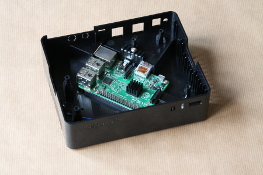
Dismantle the Plusberry Pi to allow easier access (i.e. remove the
Plusberry Pi's board)
-
Mount the Raspberry Pi (I'm using a Pi3 for this) in the enclosure
-
Connect up the IR receiver (mounted on the Plusberry Pi's front)
-
Add the Plusberry Pi's board and wire it up to the Pi (Note: connect
up the Pi's USB power before screwing down the Plusberry Pi board and
don't fully screw the board down yet - you need to lift it slightly if
you are fitting a hard drive!)
-
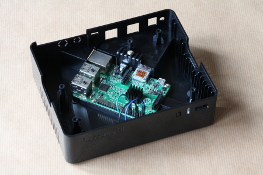
Add Wi-Fi and Bluetooth to the Pi (note that this was when the Pi
inside was a Pi2. The Pi3 has these on-board! I do still have a Wi-Fi
adaptor plugged in though, which is to set up a Wi-Fi access point).
-
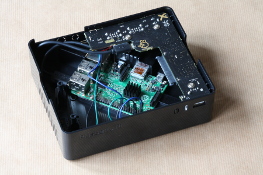
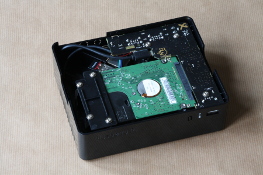
Add a hard (or solid state) drive
- Download Ubuntu Mate and install to a micro SD card.
- Modify config.txt to suit - things like CODEC license keys etc.
- Shove the SD card in the Pi and boot it up, going through the initial setup wizard.
-
Re-size the file system to use the whole SD card (default image is for
a 4GByte card)
-
Edit the SD partitions
sudo fdisk /dev/mmcblk0
- Delete the 2nd partition (press "d" to delete and the "2")
- Add a new 2nd partition (press "n" for new, "p" for primary, "2" for partition 2 and accept the defaults for first and last sectors)
- Write the changes to SD (press "w" to write and exit)
- Reboot the system for the kernel to accept the changes
-
Re-size the file system to the new partition size
sudo resize2fs /dev/mmcblk0p2
-
Edit the SD partitions
- Configure the rest of the system as you see fit.
- "Play"


The intention of this Pi is to let the boys play with gadgets like Cannybots and Flotilla which were both Kickstarter projects that I backed.
Specifications:
| Case: | Plusberry Pi | ||||
| Power Supply: | 5V / 3A wallwart supplied with the Plusberry Pi | ||||
| USB Hub: | Plusberry Pi | ||||
| Board: | Rapsberry Pi 2B (version 1.1) | ||||
| SoC: |
Broadcom BCM2836
|
||||
| RAM: | 1GiByte LPDDR2 SDRAM | ||||
| Storage: |
Sandisk Ultra, class 10 (8GByte micro SDHC)
Western Digital Blue 2.5 inch 320GB HDD |
||||
| Wi-Fi: | 802.11n adaptor (no it's not called a dongle) branded for The Pi Hut | ||||
| Bluetooth: | On-board 4.1 + HS Low-energy (BLE) (BCM43438) | ||||
| Monitor: | DELL 2209WA ( 22inch wide-screen, eIPS panel) | ||||
| Keyboard / Mouse: | Logitech Cordless Desktop Comfort Laser |


Computing Power
- Acer Aspire R3700
- Acknowledgements
- BOINC
- Desktop PC
- Eee PC 4G (701)
- Eee PC 901
- Gigabit Network
- Inspiron 14 5485 Laptop
- Kids PC 1
- Kids PC 2
- Media PC
- Mini-ITX PC
- My Useful Scripts
- Nano ITX PC
- Nook Simple Touch
- Processing Power *
- Raspberry Pi (*)
- Sharp Zaurus SL-C3200
- Storage Capacity *
- The Server
- What Is Firmware
Galleries
Follow Me


![[Valid Atom 1.0]](./images/valids/valid-atom10-yellow.gif "Validate my Atom 1.0 feed")
![[Valid RSS 2.0]](./images/valids/valid-rss20-yellow.gif "Validate my RSS 2.0 feed")